Security is a fundamental feature that cannot be bypassed in almost any application development. As we move applications to microservices architecture, security will become more complex. David Borsos presented the following four options at the London Microservices Conference in 2016:
Single sign-on (SSO): Every microservice needs to interact with the authentication service, but this will generate a lot of very trivial network traffic and repeated work. The disadvantages of the scheme are very obvious;Distributed session: This solution stores user authentication information in shared storage (such as: Redis), and uses the user session ID as a key to implement a simple distributed hash mapping. When a user accesses the microservice, the user authentication information can be obtained from the shared storage through the session ID. This solution is very good most of the time, but its main disadvantage is that shared storage requires a certain protection mechanism, and the corresponding implementation will be relatively complicated at this time;Client token: The token is generated on the client and signed by the authentication server. The token contains enough information so that microservices can use it. A token is attached to each request to provide user authentication for the microservice. The security of this solution is relatively good, but because the token is generated and saved by the client, it is very troublesome to log out. A compromise solution is to verify the validity of the token through short-term tokens and frequent checking of authentication services.JSON Web Tokens (JWT)is a very good choice for client tokens;Client token combined with API gateway: Using this scheme means that all requests pass through the gateway, effectively hiding the microservice. When requested, the gateway converts the original user token into an internal session. In this way, the gateway can deregister the token, thereby solving the problems in the previous solution.
In this article we will focus on token-based solutions, and the best option for token-based solutions is OAuth2.0.
OAuth2.0
OAuth2.0 is described in Wikipedia as follows:
Open Authorization (OAuth) is an open standard that allows users to allow third-party applications to access private resources (such as photos, videos, contact lists) that the user has stored on a website without providing a username and password to the third party application.
OAuth allows users to provide a token instead of a username and password to access their data stored in a particular service provider. Each token authorizes a specific website (for example, a video editing website) to access a specific resource (for example, just a video in a certain album) within a specific period (for example, within the next 2 hours). In this way, OAuth allows users to authorize third-party websites to access certain information, but not all content, that they have stored in another service provider.
OAuth 2.0 is the next version of the OAuth protocol, but is not backward compatible with OAuth 1.0. OAuth 2.0 focuses on the simplicity of client developers, while providing specialized authentication processes for web applications, desktop applications and mobile phones, and living room devices.
For let us first understand a few key terms in OAuth2.0:
Resource Owner: The resource owner, in other words: User;User Agent: User agent can be directly understood as a browser for Web applications;Authorization server: Authentication server, that is, a server that provides user authentication and authorization. It can be a stand-alone server;Resource server: the microservices that need to be protected.
Then, let’s take a look at the authentication flow chart of OAuth2.0 (taken from RFC6749):

The authentication process are as follows:
- After the
useropens theclient, theclientasks theuserfor authorization; - the
useragrees to authorize theclient; - The
clientuses the authorization obtained in the previous step to apply for a token from theauthentication server; - After the
authentication serverauthenticates theclient, it confirms that it is correct and agrees to issue the token; - The
clientuses the token to apply to theresource serverfor resources; - The
resource serverconfirms that the token is correct and agrees to open the resource to theclient.
From the process we can see that the client can obtain the token from the authentication service only after the user authorize it. OAuth2.0 provides the following four authorization methods for client authorization:
Authorization code mode: This mode is the most complete and strictest authorization mode;Simplified mode (implicit): This mode does not require the server of a third-party application, skips the “authorization code” step, and directly applies a token to the authentication server in the browser.Password mode: The user provides his or her username and password to the client, and the client obtains authorization from the authentication server directly through this information;Client credentials: The client obtains authentication from the authentication server in its own name, not in the name of the user. In this way, the authentication server treats the client as a user.
Example Project
1. Authentication server
First, we will build an authentication server. The server is also a standard Spring Boot application.
1.1 Dependency
1 | <dependency> |
Here we introduced spring-cloud-security and spring-security-oauth2 dependencies. jakarta.xml.bind-api and jaxb-runtime are needed if using Java11.
1.2 Client management
For OAuth2.0 applications, it is necessary to implement a client authentication management. Here we directly inherit AuthorizationServerConfigurerAdapter and add a client application through in-memory management.
1 |
|
The client ID is set to demo.
he secret is set to: pgDBd99tOX8d. {noop} is the Password Storage Format used for Spring Security 5 default password encoder DelegatingPasswordEncoder. For details refer to: Password Storage Format.
We also authorized the client with authorization_code, refresh_token, implicit, password, client_credentials authentication mode. And in the following examples we will use authorization code mode and password mode for testing.
1.3 User authentication and authorization management
1 |
|
In the above code, we still manage using in-memory and create two users:
- user001: is an ordinary user, only
USERrole; - admin: is an administrator user with
USERandADMINroles.
We also specified that all access needs to be secured, and enabled httpBasic authentication. Through this, when an unauthenticated user accesses, an authentication dialog box can pop up through the browser, allowing the user to enter a username and password for authentication.
1.4 Main application
1 |
|
Adding @EnableAuthorizationServer annotation to main class. With this annotation, the applicatoin will start with Spring Cloud Security and provide us with a series of endpoints to achieve OAuth2.0 authentication. These endpoints are:
/oauth/authorize: endpoint for authorization;/oauth/token: endpoint for getting the access token;/oauth/confirm_access: endpoint for submit user authorization confirmation;/oauth/error: endpoint for acquire authentication server error information;/oauth/check_token: token resolution endpoint for resource server access;/oauth/token_key: If using aJWTtoken, expose the public key used for token verification.
1.5 User information loading endpoint
For the authentication service, we also need to provide a user information loading endpoint, so that other microservices can use the token to obtain information about the authenticated user from the authentication server, so that user authentication and authentication processing can be achieved.
1 |
|
This piece of code will obtain the current user information from Spring Security and convert it into a Map object to return.
1.6 Configuration file
1 | # PORT |
2. User service
2.1 Dependency
The user service is a Resource server. When certain resources are accessed, user authentication and authentication are required. Therefore, a dependency on Spring Cloud Security needs to be introduced
1 | <dependency> |
Similar to authentication server, jakarta.xml.bind-api and jaxb-runtime are needed if using Java11.
2.2 Main application
In Spring Cloud Security, we only need to add the @EnableResourceServer annotation to applications that need security management to enable security management and control.
1 |
|
When spring-cloud-security is introduced and the @EnableResourceServer annotation is added, the application will start the default security management process. If you want to add more detailed security management to your application, you need to inherit WebSecurityConfigurerAdapter And implement security-related configuration, we will not go into details here.
2.3 Configuration file
1 | server.port=2200 |
We need to add an OAuth2 endpoint in the application configuration file to obtain authenticated user information
2.4 Endpoint of the current user information
In order to test, we need to add an endpoint in the user service to get the information of the currently logged in user。
1 | (value = "/my", method = RequestMethod.GET) |
The code is very simple, directly obtain the information of the currently logged-in user from the SecurityContextHolder, construct a User object, and then return.
2.5 ResourceServerConfig
As our authenticatoin-server and user-service are seperated service, they need to share the same tokenStore to share and recognize a token. In user-service, we need to tell the service to use the RemoteTokenStore located at authenticatoin-server.
1 |
|
Ok, now user-service is secured. If we now start the user-service and access: http://localhost:2200/users/my, we will see the following return:

That is, permissions are now required to access the endpoint. So how do we provide permissions?
Earlier when we talked about OAuth2.0, we mentioned that there are four client authorization modes, so let’s take a look at how to use these authorization modes to implement specific user authentication processing.
Access through authorization code mode
First, let’s take a look at how to implement user authentication through the most comprehensive authorization process authorization code model provided by OAuth2.0.
Start the service in following order:
- Eureak Server
- Auth Server
- User service
Firstly, we need tp construct a URL to obtain an access token:
1 | http://localhost:8290/oauth/authorize?response_type=code&client_id=demo&redirect_uri=http://localhost:8761&scope=spring-cloud-demo&state=63879 |
For this URL:
/oauth/authorize: This is the endpoint to get the authorization code;client_id: ID of the client. It must be included in the requested URL. Please note that the value we give here is:demo, this is what we configured the client list in theauthentication server;response_type: indicates the authorization type, which is also required. For the authorization code mode, it is fixed as:code;scope: indicates the scope of the requested authority, which can be omitted. This refers to whether the authorization is reused when there are different clients;redirect_uri: the URI to redirect to after successful authorization;state: indicates the current state of the client. Any value can be specified. This value will be returned regardless of whether the authorization is successful or not.
Visiting the URL, the page as follows:
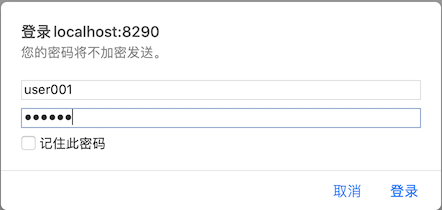
This is the browser’s own user login window. Because we haven’t logged in, the authentication server turns on the browser login mode through httpBasic, so that when the user has not been authenticated, the above login window will pop up.
Enter user001 and pwd001 in the login window, which is one of the user configured in the previous authentication server, and then it will jump to the following page:
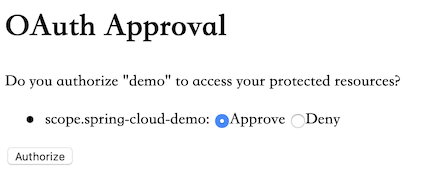
Here is the interface for whether the user is authorized. In this interface we can see that the ID and authorization scope of the incoming client. Here we click Approve, and the browser will jump to the address specified by redirect_uri. At this time, carefully observe the returned address, as follows:
1 | http://localhost:8761/?code=w3ZOlC&state=63879 |
We can see that the address contains two parameters:
code: The authorization code issued for the authentication service. The validity period of the code is short. The default is10 minutes, and the client can only use the code once, otherwise it will be rejected by theauthentication server. The code has a one-to-one correspondence with theclient IDand theredirect URI;state: This is the parameter passed in when we requested above. Theauthentication serverwill return unaltered.
Now that we have obtained the authorization code in the first step. Then the second step is to obtain the access token based on this authorization code.

We need the following parameters to construct the http post request:
/oauth/token: This is the endpoint that gets the access token;grant_type: indicates theauthorization modeto be used, which must be filled in.code: theauthorization codewe obtained in the previous step;redirect_uri: The URI to redirect to after successfully. Similarly, we need to set it to the address given previously;client_id: Client ID, must be filled in, and it must be the same as before.
In addition, in the screenshot above, we also need to fill in the authorization information. This is because our authentication server has enabled authorization verification. Here you can fill in the client ID and secret. At this point, the server treats the client as a user and is able to access the /oauth/token endpoint.
Here we mainly simplify the test method, so that we can pop up the authentication dialog box during the previous visit. However, this should not be done in actual production use. You need to define your own user login page and authorization page.
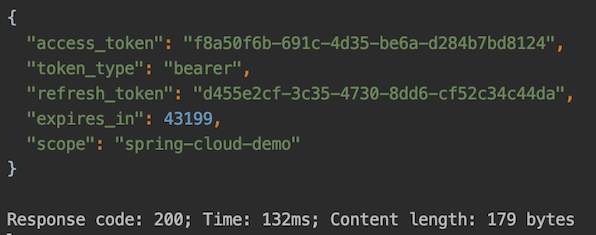
For the above request, we can get the following return
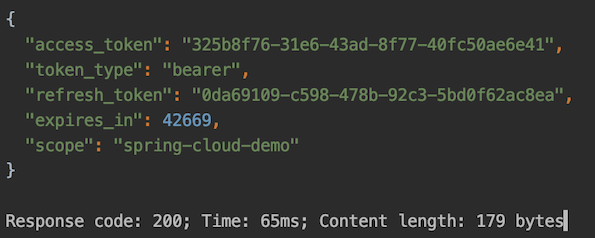
The returned content is as follows:
access_token: this is the access token obtained;token_type: Token type. The default value returned bySpring Cloud OAuthisbearer;expires_in: indicates the token expiration time, in seconds, the default is 12 hours;refresh_token: update token, which can be used to obtain the next access token after expiration;scope: The scope of the permission, which is generally consistent with the scope applied by the client.
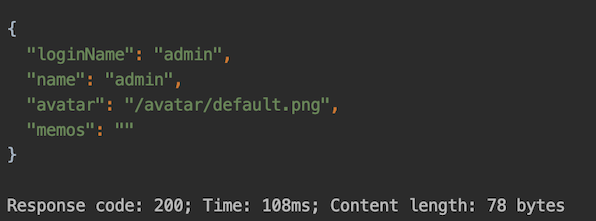
With the access token next step we can access the user service:

The response:
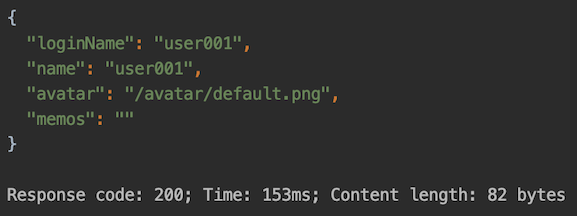
When accessing, we need to specify Authorization in the header, and set the value to the access token obtained in the previous step, so that we can get the correct data returned, as shown in the figure above.
We have completed the test of user authentication through the authorization code mode. To summarize the steps:
- Visit
auth-serverand obtainauthentication code. - Use
authentication codeto get aaccess code. - Use
access codeto accessresource server.
Access through password mode
If the authentication server is third party, using the above process is not a big problem. If the authentication server is built by us, such as this example, the authorization above is a bit complicated. Let’s take a look at how to use password mode to simplify.
We directly request the authentication server to obtain the access token:

We need to set the client ID, secret, username and password of the user, and set grant_type to password, so that you can directly obtain the access token, as shown in the following figure:
And using the access token to access user service:
This shows that user authentication is also successful.
It can be seen that the password authentication mode can greatly simplify the user authentication process, but it is provided only when the user trusts the client. Therefore, this method is suitable for the case where the client and the authentication server are the same application.
For other client authorization modes, we will not discuss here.
Check out the source code here: Security demo