Message-driven development has become one of the essential development methods for microservices architecture. This is because, 1. interface call development in traditional monolithic architecture development does not exist under the microservices architecture; 2. the development of microservices architecture requires reducing the direct dependency coupling of each microservice. If one microservice directly calls another one, then the two microservices will have a strong coupling through dependencies; 3. microservice’s autonomy principle also strongly requires that microservices cannot call each other. Therefore, message-driven development has become an inevitable trend in the development of microservice architectures.
Let’s look at a scenario in the example project:
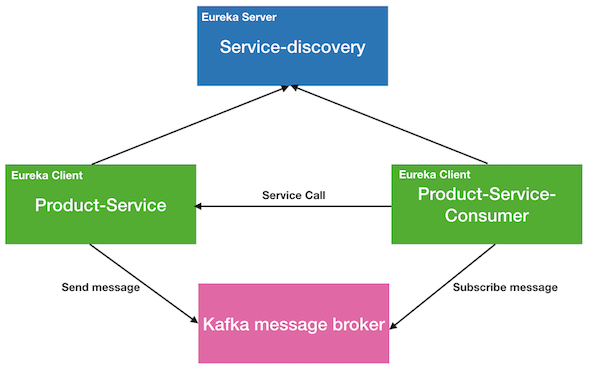
Product-Service-Consumermicroservices need to be able to achieve autonomy and minimize dependence onProcuct-Service;Product-Service-Consumermicroservices need to ensure the efficiency of the service, the development team decided to cache the product data, so that only when the first load the product microservice is required to be called. When the user requests the product next time, the cache can be retrieved, thereby improving the efficiency of the service (as for the use of memory orRedisto implement caching, this is up to you).
If it is implemented according to the above scenario, the system can work stably in most cases. What should we do once the product is modified, we will never call the Product-Service-Consumer microservice in the Procuct-Service microservice. Is this makes the coupling tighter? Well, yes, now we can let the messages go at this time.
By introducing the message, the system architecture of our example project will become as shown in the following figure:
Spring Cloud have provided a very good set of components for the message development-Stream.
Example project
We need to modify the example project, which includes the following three steps:
- Install
Kafkaserver; - Change
Product-Servicemicroservices to send product messages; - Change
Product-Service-Consumermicroservice to subscribe product messages.
Install Kafka server
Our example will use Kafka as the message broker. Kafka message broker is very light and efficient. If you don’t want to use Kafka then you can complete the docking with RabbitMQ as well, and the specific implementation of the business code does not need to be changed.
How to install and run the Kafka server is not described in detail here, I will have another post describing it. There are also very good documents on the Internet and the official, for example, the official documentation.
Product-Service
1. Add Stream dependency
1 | <dependency> |
2. application.properties
1 | # ===================================================================================================================== |
Here we mainly set the address of the Kafka server, and which topic to send product messages. Here it is set to product-topic. However, we do not need to configure these, if not configured, then Stream will connect to Kafka server and create the corresponding topic according to the default configuration. However, the prerequisite for not configuring is that you did not change the port when installing the Kakfa server, and that the Kafka server and the Product-Service microservice are on the same server.
3. Construct product message
When the product configuration changes, such as: modification, deletion, etc., a product message needs to be constructed, and then the message can be sent to the corresponding listening microservice for processing through Kafka. Therefore, the product message code to be constructed is as follows:
1 | public class ProductMessage { |
The product message is very simple and contains only two fields: action and itemCode. The meaning represented is as follows:
- action: indicates what the message is, such as a product update message or a product delete message;
- itemCode: the item number (or product ID) of the item that was changed or deleted.
You may be wondering here, why the product message only contains these two fields, is it enough? In general, these two fields are enough for the message, but in the formal production environment, we will add other fields, which will not be discussed here. In addition, when the listener listens to the message, it can perform related processing according to the message type and the item code of the product. For example, the Product-Service-Consunmer microservice will re-load the product information by remotely requesting the product microservice according to the product item code.
4. Implement message sending
When the user changes or deletes the product in the Product-Service microservice, the above product message needs to be constructed and sent. The corresponding code is as follows:
1 |
|
Sending a message is very simple, we just need to call the source.output().send() method to send the message. You may be a little confused here, what is the source, and where does it pop out. Don’t worry, now you just need to understand that this is an abstract message sending interface provided by Spring Cloud Stream. You can get a message sending channel through output() in this interface, and then you can send() the message to that channel. We will talk about the specific principle later.
5. Add message sending endpoint
We need to add an endpoint to simulate user saving/updating product information. In the above code, we can know that when we save/update the product information, the product message will be sent, so the new endpoint only needs to call this method. The specific code is as follows:
1 |
|
6. Binding Message Channel
Lastly, we need to bind Kafka message broker when the microservice starts. The implementation code is as follows:
1 |
|
Just add a @EnableBinding(Source.class) annotation to the application main class.
Ok, now we have implemented the message sending of the Product-Service microservice. Let’s complete the message subscribbing in the Product-Service-Consumer microservice.
Product-Service-Consumer
1. Add Stream dependency
This is the same as Product-Service.
2. application.properties
1 | # ===================================================================================================================== |
This configuration is similar to the Product-Service microservice, but we need to change the output to input, indicating that the message input channel is configured here.
In addition, we also added a group configuration attribute. The specific meaning of this attribute will be explained later.
3. Copy ProductMessage to this project
4. Implement message subscribbing
Using Stream, we only need to add the @StreamListener annotation to the corresponding listening method. The specific code is as follows:
1 | (Sink.class) |
This code is very simple to implement a product message monitoring method onProductMsg, and in this method different processing according to the message type.
Similarly, for Sink, I won’t go into details here. You just need to understand that this is an abstract message listening interface provided by Spring Cloud Stream. When the interface class is added the @StreamListener annotation, Stream will send Kafka to add a message subscription. The subscribed message topic is the product-topic that we specified in the configuration file. When there is a message in the topic, Stream will deserialize the message in the topic into ProductMessage, and then execute the specific message listening method.
Testing
Start the service in order:
- Kafka
- Service-discovery
- Product-Service
- Product-Service-Consumer
In the console of the Product-Service microservice, you can see output similar to the following:
1 | 2020-03-01 13:46:07.599 DEBUG 44575 --- [nio-2100-exec-1] o.s.web.servlet.DispatcherServlet : POST "/products/item-2", parameters={} |
From the output log, you can see that the product message has been sent to the message broker. If we look at the console of the Product-Service-Consumer microservice, we can see the output of the following figure:
1 | 2020-03-01 13:46:08.005 INFO 44577 --- [container-0-C-1] istener$$EnhancerBySpringCGLIB$$cb550e3b : Receive product update message, item code: item-2 |
It can be seen from the log output that the Product-Service-Consumer microservice has been able to correctly receive the product message, and then re-requested and obtained the latest information of the product.
Details of Spring Cloud Stream
From the core principle of Spring Cloud Stream, Stream provides an abstraction layer for sending and receiving messages with message broker. Through this abstraction layer, the direct coupling between messaging in the business and the middleware actually used is stripped, so that we can easily interface with various message broker, and it is also very easy to replace the message broker. This is the same as using the ORM framework, which can smoothly switch between multiple databases.
Stream application model
Stream provides the following models
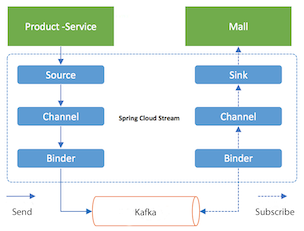
There are several core concepts on the model diagram:
- Source: When you need to send a message, you need to go through the
Source. TheSourcewill serialize the message (POJO object) we want to send (the default is converted to aJSONformat string), and then send these data to theChannel; - Sink: When we need to listen to the message, we need to use
Sink.Sinkis responsible for obtaining the message from the messageChannel, deserializing the message into a message object (POJO object), and then handing it to the specific message monitoring process for processing; - Channel: message
Channelis one of the abstractions ofStream. Usually we need to specify thetopicqueue name when sending or listening to the message broker, but once we need to change the topic name, we need to modify the code of message sending or message monitoring, but throughChannelabstraction, our code only needs to use theChannel. The specificChannelcorresponds to thetopic, which can be specified in the configuration file, so that when thetopicchanges, we don’t need to make any changes to the code, so as to achieve the decoupling. - Binder: Another abstraction layer in
Stream. Integration with different message broker can be achieved through differentBinders. For example, in the above example, we are usingBinderforKafka.Binderprovides a unified messaging interface, so that we can deploy different message broker according to actual needs, or adjust our configuration based on the messaging broker deployed in actual production.
Stream application principle
From the above, we understand the application model of Stream, and we are clear about the message sending logic and process. So how do we operate during the actual message sending and listening?
In use, Stream provides the following three annotations:
@Input: create a message input channel for message monitoring;@Output: create a message output channel for message sending;@EnableBinding: Establish a binding to the message channel.
When using it, we can create multiple channels through @Input and @Output. Using these two annotations to create channels is very simple. You only need to annotate them to the corresponding method of the interface, and you don’t need to implement the annotation specifically. . When the Stream framework is started, the corresponding implementation is generated through dynamic code generation technology based on these two annotations, and injected into the Spring application context, so that we can use it directly in the code.
Output annotation
For the @Output annotation, the return value of the annotated method must be MessageChannel, and MessageChannel is the channel for sending specific messages. For example, the following code:
1 | public interface ProductSource { |
We can send messages through the message channel created by ProductSource.
Input annotation
For the @Input annotation, the return value of the annotated method must be a SubscribableChannel, and the SubscribableChannel is the channel for message monitoring. For example, the following code:
1 | public interface ProductSink { |
We can listen to messages through the message channel created by ProductSink.
About Input, Output out of the box
Maybe you are a bit confused. Before in the example, we used Source and Sink in the code. So what is the relationship between these two classes and the annotations above? Let’s take a look at the source code of these two interfaces:
1 | // Source |
@Input and @Output are annotations of the core application of Stream, while Source and Sink are just two interfaces provided by Stream for us out of the box. With or without these interfaces, we can use Stream normally.
In addition, Stream also provides an out-of-the-box interface Processor, the source code is as follows:
1 | public interface Processor extends Source, Sink { |
That is to say, Processor can be used as message sending and message listening at the same time. This interface will be very useful when we develop message pipeline type applications.
Custom message channel name
Earlier, we talk abbout message Channel is an abstraction of Stream. Through this abstraction, you can avoid coupling with the specific topic of message broker. So what is going on? From the Source and Sink source code, you can see that the annotated @Output and @Input annotations have a parameter, which is output and input respectively. At this time, you can observe our previous configuration:
1 | # prodcut-service |
From the configuration, you can see the configuration of the destination property, which specifies the output and inout, respectively, the name of the message channel used in the Stream. Therefore, we can set the name of the message channel through these two annotations, such as:
1 | public interface ProductProcessor { |
In this way, when we use the ProductProcessor interface to implement message sending and listening, we need to configure it in the configuration file as follows:
1 | # Send |
Binding
Now that both the message sending channel and the listening channel have been created, you can connect them to specific message broker to complete the sending and monitoring of messages, and the @EnableBinding annotation is used to implement this function. The specific usage is as follows:
1 | // Send binding |
It should be noted that @EnableBinding can bind multiple interfaces at the same time, as follows:
1 | (value={ProductSource.class, ProductSink.class}) |
Use channels directly
The code we sent message previously is as follows:
1 | protected void sendMsg(String msgAction, String itemCode) { |
Since the MessageChannel provided by @Output is used when the message is sent, can we use it directly? Indeed, this is possible. We can change the above code to the following:
1 |
|
By default the Id of the MessageChannelBean created by Stream is the method name, but if we add a name definition to the @Output annotation:
1 | public interface ProductSource { |
Then at this time Stream will use pmsoutput as the Bean’s Id, and our code needs to be as follows:
1 |
|
Check out the source code here: Stream demo